Have you wondered how to use the Aqua Painter with Stampin' Write Markers, Watercolor Pencils, Watercolor Wonder Crayons, Stampin' Ink Refills or Classic Stampin' Ink Pads? Here are some tips to start using such a versatile product.
1. To use, carefully squeeze the barrel of the painter. If too much pressure is applied, liquid may come out too fast.
2. For best results, empty the barrel and wipe moisture from the brush tip for storage.
3. You can place 8 cc of water or water-soluble liquid (with the consistency of water) in the refillable reservoir.
4. Do not place liquid acrylics or shellac-based ink in the reservoir.
5. It was found that on paper lighter than 140 lb, the colors tends to not blend properly.
6. After lifting color from an image, rub the excess color off the brush between your fingers or on a paper towel. (This is also helpful when there is too much water built up in the bristles of the brush)
7. The Aqua Painter can be filled with water, bleach and even Future Floor Wax to be used with Pearl Ex.
8. Stamp with an ink that won't bleed, like Staz-On or emboss your image.
I came across an excellent Tip Sheet created by Monica Swenson of Brooklyn, WI. You can find her Tip Sheet here.
QUICK TRICKS:
Use the Aqua Painter to pull colors to blend and soften them.
Use it to paint a line on Mulberry paper for easy tearing.
Use the Aqua Painter to dampen card stock prior to distressing.
Reach for your water filled Aqua Painter to seal envelopes.
WALNUT INK TECHNIQUE. Try it with the Aqua Painter:
Walnut Ink is an easy way to add some character and aged appearance to papers that look too "new" for your layout. This tip came from a demonstrator in Utah. Take approximately 2 Tbsp. of water with 4 drops of Chocolate Chip, 2 drops of Summer Sun and 1 drop of Basic Black and put the mixture into the Aqua Painter.
One of our Designing Divas, Kristine Memmott, sent me this cute card using the Aqua Painter.
The pumpkins are colored in with the Aqua Painter. The balance of the colors on this card was with the blender pen.
Hope you have learned something new about Aqua Painters this Tuesday. Next week is Technique Tuesday when I'll have instructions on how to make a Double Slider Card! See you then! Have a great week!
Stacy P.
Tuesday, September 30, 2008
Saturday, September 27, 2008
Showcase Saturday
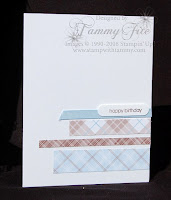
Today I would like to introduce you to Tammy Fite.
Tammy says...
I am a stay-at-home mom of two wonderful boys--Cameron (13) and Brandon (11). I am a very active volunteer with the boys' school, sports and our youth program at church. I have been married to my wonderful hubbie for almost 19 years!! (Oct 8 is our anniversary!!) We met in the Air Force at Pease AFB in New Hampshire. We've lived in Albuquerque for 16 years now, and love it!!
I have been a Stampin' Up! demonstrator for 9 years, and I love it!! When the boys were younger (read less active), I was able to earn two cruises--one to Bermuda and one to Hawaii. But, now they're very busy with sports, school and church, and business has had to slow down a bit. Isn't that the most wonderful thing about our business--we can make it what we want it to be, depending on our lives at the moment. I am still very active with SU!--offering classes, clubs and workshops. I absolutely love it, and all the GREAT friends I've made through it. The Divas are a big part of that! I "met" Max on another group, and followed her to this one when she started it many years ago! There are some great ladies in this group, and I'm thankful to be a part of it.
For the Cards:
Whisper White Cardstock & Envelopes
Banbury Designer Paper
Bitty Birthday Stamp Set
Word Window Punch
5/8" Chocolate Chip Grosgrain Ribbon
3/8" Bashful Blue Grosgrain Ribbon
For the outside band--Banbury DP, Bashful Blue, Chocolate Chip and Whisper White Cardstock. Wide Oval Punch. Non-SU! Scallop Punches
Tammy followed the Paper Pieces template found here for this project.
Thank you for sharing your card set with us, Tammy.
I hope everyone has a wonderful weekend.
Alicia :)
Friday, September 26, 2008
Cookie Sheet Organizer
So my son started Kindergarten this year and I have had the hardest time getting used to this. There are so many dates to write down and papers to keep track of. You'd think I could get a handle on this, it's just Kindergarten! I had to come up with some better way to keep track of everything. Enter, the cookie sheet...
I have seen people make a calender on a cookie sheet and then I saw this idea in Family Fun magazine (September 2008). I knew right away that I wanted to try this idea to keep track of all our school stuff. It only took me a month to actually get to making it! I told you I have been having a hard time getting use to this school thing! My stamping time has been seriously impaired as I get used to this new schedule. LOL!
I stamped the It's A Plan stamp onto computer paper and made enough to get me to Christmas break. They are layered onto a piece of Old Olive cardstock and held together with the magnet clip. I don't remember where I got the cup, but it is flat on the back, has a magnet on the back and is covered in Haiku paper. I also have some more magnets on there to help hold other papers and stuff I need to remember.
Enjoy!
Don't forget to stop back next Friday when we start our weekly sketch challenge.
~Becky T.
Supplies
Stamps: Fabulous Flowers, It's A Plan
Ink: Tangerine Tango, Versamark
Paper: Haiku Designer Series Paper, Old Olive card stock, computer/copy paper
Other: Crystal Clear Embossing Powder, Flower Fusion, Fire Circle Rhinestone Brads
Thursday, September 25, 2008
Thursday Inspiration Challenge
This is the 4th and last week of the contest for the drawing to win a free stamp set. This week's inspiration is Zen Baby Canvas Artwork that can be bought at Target. I thought this was interesting enough and has many possibilities. Some colors I drew out were Creamy Caramel, Chocolate Chip, Bashful Blue, Very Vanilla, Mellow Moss, and Ballet Blue. I see the use of many punches, faux stitching, buttons, and ribbon. Sound like enough options?! heheheheee.......
So given my many possibilities, I chose to work with the layout, faux stitching, buttons, and ribbon. I wanted to use a stamp set I haven't used just yet and thought the little frog next to the watering can was too cute from A Flower for All Seasons. I highlighted around the main image with the Bashful Blue Marker and then added Crystal Effects to the frog and flowers. The flowers also got dusted with the Fine Cosmo Glitter. I chose to use Whisper White instead of the Very Vanilla card stock because I knew I was going to use the White Gel Pen. I don't think it would have looked quite right if I did not substitute those two colors. To get a better look at my sample, just click on it and you can see better details. Here is what I came up with:
Stamps: A Flower for All Seasons, Classic Backgrounds, Serene Spring
Paper: Creamy Caramel, Chocolate Chip, Bashful Blue, Whisper White, Mellow Moss, and Ballet Blue
Ink: Bashful Blue, Basic Black
Accessories: Silver Brads, Crystal Effects, Fine Cosmo Glitter, White Gel Pen, Rich Regals and Soft Subtles Buttons, White Taffeta Ribbon, Silver Cord, Paper Piercer, 1 3/4" Circle Punch, 1 3/8" Circle Punch, Word Window Punch, Stampin Write Markers - Going Gray, Mellow Moss, Ballet Blue, Bashful Blue, Chocolate Chip
To see what my creative team came up with, just click on their name :
Bev
Charmaine
Elizabeth
To view the submissions on SCS click here.
Now it's your turn! Post a link in the comments section with your blog entry or SCS gallery showing us what creation you were inspired to come up with!! If you upload to SCS be sure to put DivaIC10 (no spaces) as the keyword. Have fun!!
Inspire Stampin' happiness wherever you go!! :)
~~Maria~~
Wednesday, September 24, 2008
Is this the last Wacky Wednesday?
Hello! It's time for another Wednesday post! The new blog team officially takes over on October 1st. I will find out what the theme for Wednesdays will be shortly, I'm sure.
For my last wacky post (the ones where I just post whatever comes to me! LOL) I chose to make a card based on the Splitcoaststampers sketch challenge for today. I looked through my stash of DSP and found a package of Summer Picnic. I love the colors in this paper and think they work just great for Fall, too. ;) My calendar says it's Fall now, so I'm going to go with that even though it sure does feel like summer here in Tampa!
My squares are Old Olive cut to 3" X 3". The DSP is cut to 2 3/4" X 2 3/4". I used Pumpkin Pie for the card base and the scallop circle. The sentiment from Think Happy Thoughts is stamped on Whisper White in Old Olive ink and punched with the 1 1/4" circle punch. It's layered on a 1 3/8" Old Olive circle and then on the Pumpkin Pie scallop circle. I used SU!'s white gel pen to doodle on the scallops. I glued on a So Saffron button with some linen thread tied through it. The scallop circle is up on dimensionals. Pumpkin Pie ribbon is tied around the bottom square.
That's it for today! Make sure you check back tomorrow for the Inspiration Challenge!
Hugs!
Elizabeth
Supplies(all SU!): Stamps- Think Happy Thoughts. Paper- Old Olive, Pumpkin Pie, Whisper White, Summer Picnic DSP. Ink- Old Olive. Accessories- Scallop circle punch, 1 1/4" circle punch, 1 3/8" circle punch, white gel pen, So Saffron button, linen thread, Pumpkin Pie ribbon, dimensionals.
Labels:
buttons,
DSP,
Elizabeth Harris,
Think Happy Thoughts
Tuesday, September 23, 2008
Have You Been Cracked Up Lately?
I was trying to choose which technique to share with you this Tuesday and came across a technique that I haven't tried ... now I'm challenged to. It looks SO easy! It's called Cracked Glass. I found the instructions on our own Stampin' Up! Demonstrator Website. (For those of you that haven't become a Stampin' Up! demonstrator yet - here is one of the many +++'s of becoming a demonstrator! We have our own Demonstrator Website that offers us exclusive video and written training guides for all sorts of techniques, product uses and samples galore! If you want to be a part of this great team, contact your local demonstrator and sign up TODAY!) Okay ... I'll move onto the technique instructions. :-D
CRACKED GLASS INSTRUCTIONS:
Supplies Needed:
Here's some samples with the Cracked Glass.
Now that I've shared this fun technique - I'd like to see you take this challenge and post what you've done lately that has really "cracked" you up?!
Have a great week and I'll see you here next Tuesday where we will learn more about the infamous Aqua Painter.
Stacy P.
CRACKED GLASS INSTRUCTIONS:
Supplies Needed:
- Stamps
- Card Stock
- VersaMark
- Brayer
- Glassy Glaze Enamel Stampin' Emboss powder
- Powder Pal
- Heat tool
- Crafters' Tool Kit
- Freezer
- Optional: Sponge Daubers
- Stamp your image, and cut card stock to desired size.
- Apply VersaMark® over entire piece of card stock using a brayer or direct-to-paper technique.
- Sprinkle Glassy Glaze Enamel Stampin' Emboss® powder over entire piece of card stock. Be sure to use your Powder Pal! Tap off excess powder, and melt remaining powder using heat tool. Use the tweezers from the Crafters' Tool Kit to hold your card stock if you're creating a small accent piece.
- For small images, sprinkle on additional powder while the image is still hot. For larger images, allow card stock to cool and apply additional VersaMark ink before sprinkling more powder over the image. Repeat up to four times.
- Put your card stock in the freezer for a minute or two to ensure the glaze has cooled completely.
- Remove card stock from freezer, and bend back and forth until the enameled layer cracks. Continue bending different portions of the card stock until you've achieved the look you desire.
- (Optional): Sponge ink into the cracks in your enamel using a sponge dauber.
- (Optional): Finish your project using the crackled-glass image as an outstanding focal point.
Here's some samples with the Cracked Glass.
Now that I've shared this fun technique - I'd like to see you take this challenge and post what you've done lately that has really "cracked" you up?!
Have a great week and I'll see you here next Tuesday where we will learn more about the infamous Aqua Painter.
Stacy P.
Saturday, September 20, 2008
Saturday with Sara
Today I have the pleasure of introducing you to Sara C. It's been great getting to know Sara and I'm blessed to have become friends with such a caring individual. Here's what she has to share about herself...
I am a passionate Stampin' Up! demonstrator who lives in South Windsor, Connecticut. I’m the proud mother of two beautiful girls, and the wife of one fabulous man. One of my favorite things to do is to recreate projects I’ve seen online, at seminars or in the stores - all from memory, without directions. I also like to work with color and different layouts and designs. "Never be afraid to think outside your comfort zone. And don't ever forget to find time for yourself and have fun doing what you love."
Here is a recent project I demonstrated at a workshop. This is a scrapbook page that started as a 6 x 6 page. The base is on Kiwi Kiss, and is accented with Chocolate Chip and Whisper White mats. The layered background image is stamped from the "Inspired by Nature" set in Kiwi Kiss and Whisper White. A chocolate chip ribbon with a slide from Hodgepodge Hardware is added for accent.
This 2nd image shows how you can adapt the smaller page to an 8 1/2 x 11 page, and then to a 12 x 12 page by utilizing coordinating colors and stamped images from the same stamp set.
I hosted a monthly scrapbook club this year that invited the club's participants to take a journey reflecting upon themselves. This installment is from September. Each of the sentiments are stamped from the "Smarty Pants" set. The flowers are from the new "Pocket Silhouettes" set (on sale this month!), and are stamped on circle "cards" which open up to reveal "lessons learned in my lifetime."
If you want to check out more from Sara, feel free to visit her blog. Thanks, Sara for sharing yourself and work with us. So glad we were able to get to know you a little more.
Hope everyone has a wonderful weekend.
Alicia :)
Friday, September 19, 2008
Christmas Cards with Barbara
Hi Everyone and Happy Friday! Here are some Christmas cards from one of our members Barbara Dykhouse (who also happens to be my Mom). She created these for a Holiday Mini Catalog swap that I am hosting. These fabulous new sets are from the Holiday Mini catalog, which you can start ordering from October 1 (or if you are a demo, ordering started September 1.)
Her first card uses Scandinavian Season and the matching wheel...
Her second card shows a fun and impressive way to use the new Bigz Top Note die for the Big Shot. She ran it through the Big Shot with a folded piece of Kraft paper so that it made a little card in that shape, then attached it to the Riding Hood Red cardstock. How cute is that!!!
The second picture shows how the kraft with the skaters opens up to reveal the message inside.
Thanks so much for sharing your cards with us Mom. Don't forget to come back in October to see our new sketch challenge.
Enjoy!
Becky T.
Scandinavian Season Supplies
Paper: Chocolate Chip, Kiwi Kiss, Riding Hood Red, Whisper White
Ink: Kiwi Kiss, Chocolate Chip
Stamps: Scandinavian Season, Scandinavian Wheel
Accessories: Kiwi Kiss 5/8" striped ribbon, ticket corner punch, 1" circle punch, rhinestone brads ice
Winter Post Supplies
Paper: Riding Hood Red, Kraft
Ink: Chocolate Chip, Close to Cocoa, Riding Hood Red, Pink Pirouette, White Kraft
Stamps: Sanded Background, Winter Post
Accessories: Blender Pens, Clear embossing powder, Riding Hood Red taffeta ribbon, styled silver hodgepodge, sticky strip, Top Note Bigz Die for Big Shot
Thursday, September 18, 2008
Thursday Inspiration Challenge
What a heck of a week it has been! Hurricane Ike reared his ugly head and affected a good portion of the country starting in the South and working up to the North. My heart goes out to all those who were hit by Ike and I hope things can get back to normal as quickly as possible for everyone.
Now, Diva Inspiration Challenge #9 is up! For those who are trying their chance at winning a free stamp set, this is week 3 of 4. This week's inspiration comes from a shirt found at Gap.com. Pink and Brown are a favorite color combination that I have become hooked on. The silhouette on the shirt brought a couple of new stamp sets to mind - Upsy Daisy and Inspired By Nature just to name two. The wheels are turning pretty quickly and piece by piece my project began to come to life. Now would you believe the saying in the top right corner took the most time to put together?!? LOL! I kept layering it with different punches until I came across the right piecing and then deciding on the layer of colors took another great while.....sheesh! But her is the final draft:
Stamps: Upsy Daisy
Paper: Chocolate Chip, Pretty in Pink, Whisper White, Bella Rose DS
Ink: Chocolate Chip Classic and Craft
Accessories: Pretty in Pink Taffeta Ribbon, Soft Subtles Brads, Paper Piercer, Dimensionals, Punches - 1 3/4" Circle, Wide Oval, Large Oval
To see what my creative team came up with, just click on their name :
Bev
Elizabeth
To view the submissions on SCS click here.
Now it's your turn! Post a link in the comments section with your blog entry or SCS gallery showing us what creation you were inspired to come up with!! If you upload to SCS be sure to put DivaIC9 (no spaces) as the keyword. Have fun!!
Inspire Stampin' happiness wherever you go!! :)
~~Maria~~
Wednesday, September 17, 2008
Another Wacky Wednesday!
It's time to get wacky again! ;)
I decided to watch some of my Workshop Wow DVD that I purchased at Convention. The very first technique was the Mosaic technique. I loved it! I had to try it right away! I ran a piece of cardstock through my Xyron sticker maker. I then proceeded to put cut pieces of Dashing DSP (retired) all over the sticky stuff. It was so fun! When I had most of the sticker paper covered with DSP I sprinkled Gold EP over the entire piece. The powder will stick to the exposed sticker paper. I embossed with my heat tool and layered the mosaic piece on a piece of Real Red cardstock. I used Old Olive cardstock for my card base. The sentiment from Heard from the Heart is stamped on the card base with Versamark and embossed with Gold EP. I love the way this card turned out. I will be using it as one of my Christmas card designs this year.
Supplies(all SU!): Stamps- Heard from the Heart. Paper- Old Olive, Real Red, Whisper White. Ink- Versamark. Accessories- Gold EP.
Thanks for visiting! I'll see you back here next Wednesday!
Elizabeth
Labels:
card making,
Cards,
christmas,
Elizabeth Harris,
Heard from the Heart
Saturday, September 13, 2008
Showcase Saturday
Today I would like to introduce you to Chirsty. Who is she?? Well...I'll let her tell you.
Inspired By Nature
Paper – Kiwi Kiss, Whisper White, Chocolate Chip Card Stock
Ink – Kiwi Kiss Classic Stampin’ Pad
Stamps – Inspired by Nature
Accessories – Hodgepodge (retired), Natural Hemp Twine
Upsy Daisy
Paper – Ruby Red, Chocolate Chip, Old Olive, Whisper White Card Stock
Ink – Ruby Red and Chocolate Chip Classic Stampin’ Pad
Stamps – Upsy Daisy
Accessories – Scallop Edge Punch
Organic Outlines
Paper – Kraft, Old Olive and Ruby Red Card Stock
Ink – Ruby Red Classic Stampin’ Pad
Stamps – Organic Outlines
Technique – Stamping with Bleach
Accessories – Ticket Corner Punch, 1/16 Circle Punch, Scissors, Silver Brads
Pocket Silhouettes
Paper – Kraft, Pumpkin Pie, Chocolate Chip, Kiwi Kiss and Whisper White Card Stock
Ink – Chocolate Chip Classic Stampin’ Pad
Stamps – Pocket Silhouettes
Technique – Stamping with Bleach
Accessories – Curley Label Punch
Candy Gift
Paper – Whisper White
Ink – Tangerine Tango Classic Stampin’ Pad
Accessories – Chocolate Chip ¼-in Grosgrain Ribbon, Scallop Square Punch, Metal Tin
Thanks, Christy for sharing about yourself and your projects with us.
Have a wonderful weekend. :) We'll be celebrating my oldest's b-day. I can't believe he's going to be 3!
Alicia :)
Who is Christy Tyler?
I am the mom of two boys – Dylan (4 years old) and Cameron (2 years old) and wife to Robert for almost 8 years. We live in San Ramon, California with our very old beagle Tana, 4 chickens (Princess Laya, Uniquia, Tasha and Luku) and a fish named Fishy. My son Dylan named all of our pets. I am a geologist by education however after the birth of my second son I left the working world to be a stay-at-home-mom. I started substitute teaching last year just to give my stamping business bank account a boost and just recently took a long-term substitute position teaching 6th grade earth science. I am having a blast teaching science, but I will be very happy when the job is over and I can resume mommy duties as well as devote more time to the success of my business. When I am not with my family, teaching, or working on my business I am busy with my volunteer jobs. I am the coordinator of a non-profit group of women who own/run their own businesses called “Moms in Business”, I am on the outreach committee of my Mother’s Club as well as heavily involved in City/County/State politics.
I love fine wine, hanging out with my mommy friends, traveling the world, spending time outside and, of course, stamping! I have been stamping for over 4 years but a demo for less than 1 year. I love to make cards and am trying to scrapbook. My stamping room is the garage, which I tend to visit only after the kids have gone to bed and usually get lost in my projects only to crawl into bed around 2-3am in the morning. My husband and kids love to make their own cards as well and I often find them hard at work at my desk. They always surprise me with something homemade for every occasion. I could not ask for a more supportive stamping environment!
If I had to pick a “style watch” which best fit my sense of style and taste, it would definitely be the Silhouette series. I love all the stamp sets in this series as well as the matching designer series paper. I find myself using either In Colors or Earth Elements the most out of all the color groups.
I have really enjoyed getting my business up and running over the last couple of months. I current host one stamp camp on the last Friday of the month where we make 8 to 10 cards of various themes or get together for a free scrapbooking night. I just started my very first stamp club, which is comprised of ten wonderful women, some of whom I have known for years and others that I just met. I am also trying to get my blog formatted/up and running.
I really love to share my craft with others and can’t wait until my next event! Here are a few of the cards that we made at my last two events for you all to enjoy.
Happy Stamping!
~Christy Tyler
http://ctyler.stampinup.net/
http://www.urbanstampgirl.com/
Inspired By Nature
Paper – Kiwi Kiss, Whisper White, Chocolate Chip Card Stock
Ink – Kiwi Kiss Classic Stampin’ Pad
Stamps – Inspired by Nature
Accessories – Hodgepodge (retired), Natural Hemp Twine
Upsy Daisy
Paper – Ruby Red, Chocolate Chip, Old Olive, Whisper White Card Stock
Ink – Ruby Red and Chocolate Chip Classic Stampin’ Pad
Stamps – Upsy Daisy
Accessories – Scallop Edge Punch
Organic Outlines
Paper – Kraft, Old Olive and Ruby Red Card Stock
Ink – Ruby Red Classic Stampin’ Pad
Stamps – Organic Outlines
Technique – Stamping with Bleach
Accessories – Ticket Corner Punch, 1/16 Circle Punch, Scissors, Silver Brads
Pocket Silhouettes
Paper – Kraft, Pumpkin Pie, Chocolate Chip, Kiwi Kiss and Whisper White Card Stock
Ink – Chocolate Chip Classic Stampin’ Pad
Stamps – Pocket Silhouettes
Technique – Stamping with Bleach
Accessories – Curley Label Punch
Candy Gift
Paper – Whisper White
Ink – Tangerine Tango Classic Stampin’ Pad
Accessories – Chocolate Chip ¼-in Grosgrain Ribbon, Scallop Square Punch, Metal Tin
Thanks, Christy for sharing about yourself and your projects with us.
Have a wonderful weekend. :) We'll be celebrating my oldest's b-day. I can't believe he's going to be 3!
Alicia :)
Friday, September 12, 2008
Fabulous Friday
Good Morning and Happy Friday! My name is Becky and I am going to be posting on Fridays here at our UDI blog. Starting in October we will have a sketch challenge for you to participate in but today I am going to share one of my favorite (and easy) techniques...Paper piecing. This is simply stamping your line-art image (something that needs to be colored in) onto patterned paper, cutting it out and using it as your image. I used Embrace Life, which is not a Christmas set but I was able to make a pretty Christmas card. Here is a card that we are going to be making at one of my upcoming technique classes.
Another thing I like to do and teach others to do is to take a card that you like and change the colors and patterned papers to create a new look. Here are 2 more cards that I made using the same stamps and layout. Now we no longer have a Christmas card, but a pretty card that can be sent in the fall and a pretty Thank you note for anytime of the year.
I hope you enjoy! Thanks for stopping by and come back on Fridays in October for out new sketch challenge.
Supplies
Stamps: Embrace Life, Fundamental Phrases
Accessories: Dazzling Diamonds and 2-way glue pen (Christmas Card), Large Oval punch, Key Tag punch, dimensionals
Christmas Card Ink and Paper: Basic Grey, Old Olive, Baja Breeze, Very Vanilla, Holiday Treasures DSP
Fall Card Ink and Paper: Basic Grey, Tangerine Tango, Old Olive, Very Vanilla, Haiku DSP
Thanks Card Ink and Paper: Basic Brown, Chocolate Chip, Pink Pirouette, Whisper White, Always DSP
Thursday, September 11, 2008
Thursday Inspiration Challenge
This is week two for the drawing for a free stamp set! Today's BEAUTIFUL (and yummy) inspiring picture comes from Martha Stewart. I love all the red's and pinks! There is so much to pick from in this picture such as weaving, rose theme, stripes and so on. I like pictures like this where you have many options to pull from!
For my sample, I immediately envisioned Crazy for Cupcakes. I then started to consider the giant cupcake from Simple Birthday Thanks. So what's a girl to do?!? If I get the chance, I'll make a second sample and post it to DivaIC8 on scs.
Here's my sample for this week. The card base is 6" x 8-1/2" (then folded in half). Being how big the cupcake itself is, I needed a slightly bigger base for it.
Stamps: Simple Birthday Thanks
Paper: Basic Black, Pink Pirouette, Pretty in Pink, Regal Rose, Whisper White, Georgia Peach
Ink: Basic Black
Accessories: Crystal Effects, Fine Cosmo Glitter, Trio Flower Punch, Lg Oval Punch, Wide Oval Punch, Dimensionals
To see what my creative team came up with, just click on their name :
Bev
Charmaine
Tandra
Elizabeth
To view the submissions on SCS click here.
Now it's your turn! Post a link in the comments section with your blog entry or SCS gallery showing us what creation you were inspired to come up with!! If you upload to SCS be sure to put DivaIC8 (no spaces) as the keyword. Have fun!!
Inspire Stampin' happiness wherever you go!! :)
~~Maria~~
Wednesday, September 10, 2008
It's going to be a Wacky Wednesday!
Hello! My name is Elizabeth Harris, and I'm a mom of 2 great kids, a son and a daughter. We live in Tampa, Florida. I will be posting to the UDI blog on Wednesdays now. I have some huge shoes to fill. Leonie is so creative and did a fantastic job! October will be the official start date for my posts, but Max asked me if I would mind posting today. Of course I don't! :)
I had no mojo today, so I opened up the gorgeous new Stampin' Up! catalog for some inspiration. They don't call it the Idea Book & Catalog for nothin', ya know! I lovingly paged through my catalog, and decided to use the sketch from the Bugs & Kisses card on page 69. My card is 4 1/4" X 5 1/2". I used the new Party Hearty set, the new Scalloped Edge punch and some new In Colors. See a trend? LOL I stamped the cupcakes on Shimmery White paper. I couldn't capture the sparkle in the picture, but, believe me, it's there. I need to use this paper more often. I always forget I have it. Guess I should get it out of the cabinet and out where I can see it.
Have a fantastic evening, and I'll be back soon! I can't promise it'll always be wacky, but you can never tell with me! ;)
Here's what I used on my card...all SU!, of course! Stamps- Party Hearty. Paper- Shimmery White, Kiwi Kiss, Riding Hood Red, Pumpkin Pie. Ink- Pumpkin Pie, Taken with Teal, Ruby Red, Rose Red, Old Olive, Creamy Caramel. Accessories- Scalloped Edge punch, Crop-a-dile, Stamp-a-ma-jig.
Labels:
08-09 In Color,
card making,
Elizabeth Harris,
Party Hearty
Tuesday, September 9, 2008
Is it getting crisp in the air where you live?
Fall is in the air and that is the source of Tina McIntyre's creativity with this wonderful fun Fall card !!
She has been so gracious in letting us know how she made this great card. Here are the instructions:
The Pumpkin Pie cardstock was cut to standard size card (4 1/4" x 5 1/2"), The Very Vanilla card stock was then cut to 4"x5", The Chocolate Chip cardstock was cut to 3 1/2" x 3". The Always Artichoke cardstock was cut a tad smaller, 3"x3", And I used the left over pieces of Very Vanilla to stamp my images on, along with the background of the Thankful Thoughts wording with Chocolate Chip ink.
First stamp your leaves using the stampin' spots, I would stamped back and forth from the Chocolate Chip to the Pumpkin Pie. Then run adhesive and put on top of your Pumpkin Pie cardstock. Next adhere your Chocolate Chip paper and then your Always Artichoke. Using your Chocolate Chip stampin' write marker, go around the edge to make a faux stitch line. Next color in your images that you would like to apply to your card, I used the pumpkin, sunflower and leaf (these images were stamped with Always Artichoke classic ink and then stamped on Very Vanilla). I outlined the pumpkin body with Really Rust stampin' marker, then colored it in with Pumpkin Pie, Always Artichoke with the vine and Close to Cocoa. The leaf was outlined with Always Artichoke marker and then colored in with Mellow Moss. The sunflower is only colored in with Summer Sun & Close to Cocoa. I then ran the glue down the Pumpkin and adhered. Then took my extra rubber pieces and attached them to my flower and leaf, then ran glue on those and adhered. Next I stamped the saying on Very Vanilla in Always Artichoke, glued it down to a scrap piece of Chocolate Chip and adhered with stampin' dimensionals. Finally I did a special touch with adding Crystal Effects to the images.
Tina hopes you enjoy the card, enjoy Fall and hope she has helped spark some creative juices!!!!
STAMP SET:
Thoroughly Thankful
CARDSTOCK :
Chocolate Chip, Pumpkin Pie, Always Artichoke, Very Vanilla
INK:
Chocolate Chip stampin' spot, Pumpkin Pie stampin' spot, Always Artichoke classic ink pad
ACCESSORIES :
Snail Adhesive
Stampin' Dimensionals
Stampin' Write markers
Crystal effects
NOTES:
NOTES:
** Left over rubber pieces were used from cutting stamps to POP out the flower and leaf, higher then the su dimensionals, with the thankful thought saying**
**Faux stitching was done with chocolate chip stampin' write marker.
** I also colored in this same kind of card, but used stampin' pastels.
Thank you Tina for sharing such a wonderful card with all of us.
Stacy P.
Thank you Tina for sharing such a wonderful card with all of us.
Stacy P.
Monday, September 8, 2008
Introducing our New Blog Manager
Hello Everyone!
Happy Monday to you.....I apologize for not being more on the ball with our Blog. Starting October, we have lots of fun stuff! We have changed a few of our coordinators. A big thank you to Jennifer Thomas and Leonie Schroder for all their hard work and efforts. I am happy to announce replacements for these amazing women. "Elizabeth Harris" from Florida and "Becky Teusink" from Michigan.
We have a Design Team all willing to share their work with everyone. Demonstrators who are very creative and talented. Our new program will begin the first week of October. You can look forward to many wonderful projects. With the upcoming holidays, you won't want to miss our fabulous ideas.
It is with sadness that I also let you know that Edie Bunting who has been absolutely amazing has had to step down from her role as UDI Blog Manager due to health issues. Edie plans to stay with our group (She wouldn't have had a choice there :) but we needed to replace her duty here.
It is with great excitement that I welcome "BECKY ROBERTS" to you from Boise, ID. I have long been a fan of Becky's blog and she is amazing. I was so glad to get the opportunity to meet Becky at Convention and was grateful she lived just a few hours away in ID. ROAD TRIP !!! ;)
The projects shown here today were created by Becky and you can visit her blog at http://www.inkingidaho.blogspot.com/
Becky is in her forties.....early forties I must add. She has been married to George for 15 years and kept her maiden name as George's last name is "Papadopoulos". I know she wants us all to think she is Julia's sister :) Becky and George have 2 sons, Benjamin (12) and Nicholas (9).
Becky was introduced to stamping 9 years ago, spent her obligatory $50 at her friends party, and hid it under the bed with absolutely no intention of ever using it again. Shehated it. She thought it was pointless and expensive. Well, the expensive part is correct :o) A year later, Becky was invited back again. The demo two-stepped stamped all over a piece of glossy cardstock with the hydrangeas stamp, cut it up into bookmarks, they used some new punch on the corners, threaded a ribbon through it and she was hooked. Weird huh? The next year Becky's demo needed one more recruit to make cruise so she signed her up and told her later. Becky was supposed to drop in three months, but 9/11 happened and new demo’s were extended another 3 months. Two days before she was to drop, Becky did a spontaneous show for a friend who gathered her girlfriends together. It was over $1000 and that was all it too for her to see the great potential with SU!
This is Becky's 7th year with SU!. She has earned 2 cruises, presented a workshop wow at Reno. Becky was averaging about $40,000 a year in sales, until last year when her husband moved her to Idaho. (from California).
Please join me in welcoming Becky as our new Blog Manager. She really was 'pressured' into the position but I know she will do a fabulous job.
Have a wonderful day
Max
Saturday, September 6, 2008
Spotlight Saturday
Another Saturday, another Diva to Spotlight. Today I would like to introduce you to Jen S. Here's a little about Jen...
I became a SU! Demo strictly for the 20% off - My MIL and SIL are my best customers (other then myself) and together they hold some really wild workshops -
They invite a good 20-40 people - and we have a blast! I've only been a demo since March but have held 4 big workshops - and hoping for a couple more in November/December.
I am due to have baby #6 on Sept 10th so I'm taking a little break from stamping - just a couple weeks :) but plan on coming back full time in October/November to try to get a little more then just a couple of workshops - I'm going to turn my SU! demonstratorship into a Business - not just a hobby :) Wish me luck!!
For the candy box, Jen wrapped a 3x3 card around a box.
Stamps-Happy Heart Day
Cardstock-Cameo Coral and Whisper White
Accessories-Stampin' Pastels, Blender Pen
3x3 Notecard and Box
Contains 3 3x3 note cards and envelopes with a matching box
Stamps-Tart and Tangy
Cardstock-Real Red, Glorious Green, Whisper White
Accessories-Red Gingham ribbon, Scallop Circle punch, 1 3/8" Circle punch
Thanks for sharing your creations with us, Jen.
Have a wonderful weekend!
Alicia :)
Thursday, September 4, 2008
September's Inspiration Challenge Free Stamp Set!!!
Here it is! This is the first of four Diva Inspiration Challenges for the chance to win a free stamp set!! In order to be in the running for the free stamp set, you need to participate in each weekly inspiration challenge that I post on Thursdays through the month of September. Just post a link to your project in the comments section. Please use current Stampin' Up! products on your projects. You will have until the next Diva Inspiration Challenge to get your project in (9/10). Those who play every week in September will have their name entered into a drawing to see who gets the free stamp set!! Read the contest post here.
Inspiration Challenges push your visionary muscles to create your project. You can use anything that sparks your creativity from the picture whether it's the layout, the colors, or a similar technique! Most importantly, have some stampin' fun!!! :)
This week's inspiration came from a dress at Barney's New York. Right away, Reverse Spotlighting or Split Negative comes to mind as I look at the pattern of the dress. Some possible colors are Basic Black, So Saffron, Close to Cocoa, Pretty in Pink and Old Olive.
Here is my interpretation this week: Funny Story too.... I first started out with the Floral background stamp. I did the Split Negative Technique diagonally and then went ahead to do the Reverse Spotlighting, only it didn't turn out quite right to say the least......LOL! It was too busy and you couldn't really see the techniques clearly. I finally scrapped it and started new.....
This sample is a lot easier on the eyes - trust me! I took it one layer at a time and then kept asking the question "what else". One of the "what else"'s is the Iridescent Ice on the butterflies. Another is Photo Corners, then the black brads. I kept asking the question until the card seemed "finished", and that's how I left it! :)
Stamps: Flight of the Butterfly, Best Yet
Paper: So Saffron, Old Olive, Pretty in Pink, Basic Black, Whisper White
Ink: So Saffron, Basic Black, Always Artichoke, VersaMark
Accessories: Photo Corner Punch, Large and Small Oval Punch, 1 1/4" Circle Punch, Black Brads, Black Grosgrain Ribbon, Iridescent Ice EP, White Gel Pen, Dimensionals.
To see what my creative team came up with, just click on their name :
Bev
Charmaine
Tandra
Elizabeth
To view the submissions on SCS click here.
Now it's your turn! Post a link in the comments section with your blog entry or SCS gallery showing us what creation you were inspired to come up with!! If you upload to SCS be sure to put DivaIC7 (no spaces) as the keyword. Have fun!!
Inspire Stampin' happiness wherever you go!! :)
~~Maria~~
Monday, September 1, 2008
Win A Free Stamp Set!!!!
That's right, you can have a chance to win a FREE stamp set from the new 2008 Fall/Winter Idea Book and Catalog ($19.95 or less)!!!
How? Every Thursday there is an Inspiration Challenge posted on the UDI blog. Participate every week in the month of September (9/4, 9/11, 9/18 & 9/25) and your name will be entered into the drawing!!
Rules: Please use current Stampin' Up! product (unless Stampin' Up! does not carry it) on your project. You have until the next challenge is posted to leave a comment with your link (to either your scs gallery or blog entry) showing your project. For example - DivaIC7 will be posted on 9/4. You will have until 9/10 to get your project entered to be in the running for the free stamp set.
Sound fun? I hope so!!! I hope to see those intimidated by Inspiration Challenges to stretch their creative muscles and take the plunge! How much easier can it be - simply stamp to win!!!
Let me know if you have any questions!!!!!
Maria :)
Subscribe to:
Posts (Atom)